
Filed under: inspirations, materials | Tags: DIY, do it yourself, handmade, k'nex, kristin boehm, light box, light tent, lightbox, spinhandspun
After months of photographing my work with so-so results, I decided it was time to invest in a lightbox. And what better way to do it than to Do It Yourself? In search of the perfect supplies, I raided my parents basement and came across my favorite childhood toy: a box of K’nex!
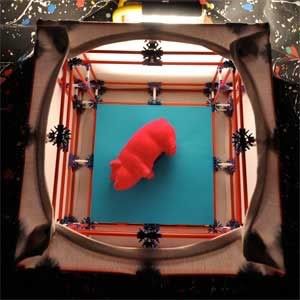
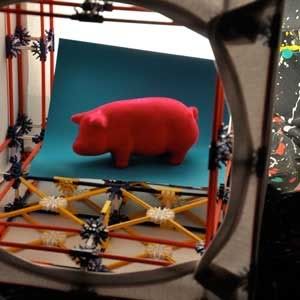
If you’re wondering what a lightbox can do for you, look no further than my dingy-yellow digital ‘graphs in the K’nex building portion of this tutorial, then compare those to these images taken inside of the completed K’nex lightbox. Lightboxes keep your colors looking bright, reduce shadows, and make sure your images look clean and professional. Follow the tutorial below to create your own…
 |
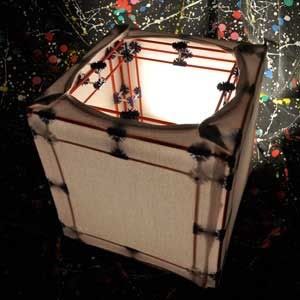 Knex lightbox. 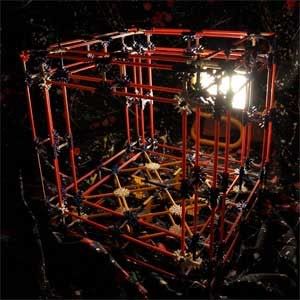 Knex structure without screen.
|
What You Will Need
| K’nex | ||
 |
8 | red connectors |
 |
8 | yellow connectors |
 |
20 | white connectors |
 |
46 | blue connectors |
 |
134 | purple connectors |
 |
96 | white rods |
 |
32 | blue rods |
 |
32 | yellow rods |
 |
105 | red rods rods |
| Remember! If you don’t have enough of a certain piece, improvise (e.g. two blue rods and an orange connector = one red rod) | ||
Other Materials
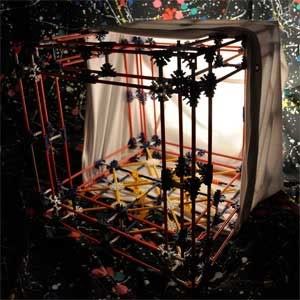
K’nex Lightbox Structure Instructions (with clickable images!):
My apologies for the yellowish image quality, but unfortunately I did not have a lightbox for my lightbox!
Note: In the first four steps, I have indicated places where blue K’nex/red or white connectors take the place of white K’nex/purple or blue connectors in the general model using an *asterisk symbol. These longer blue pieces are used as ground supports on the bottom, and as places where the eyelets of your screen will catch along the top or side of the structure (depending on which direction you are photographing). Furthermore, not all blue replacements have been indicated with an asterisk — just those that are hard to see. Keep an eye out for these subtle changes in the general structure!
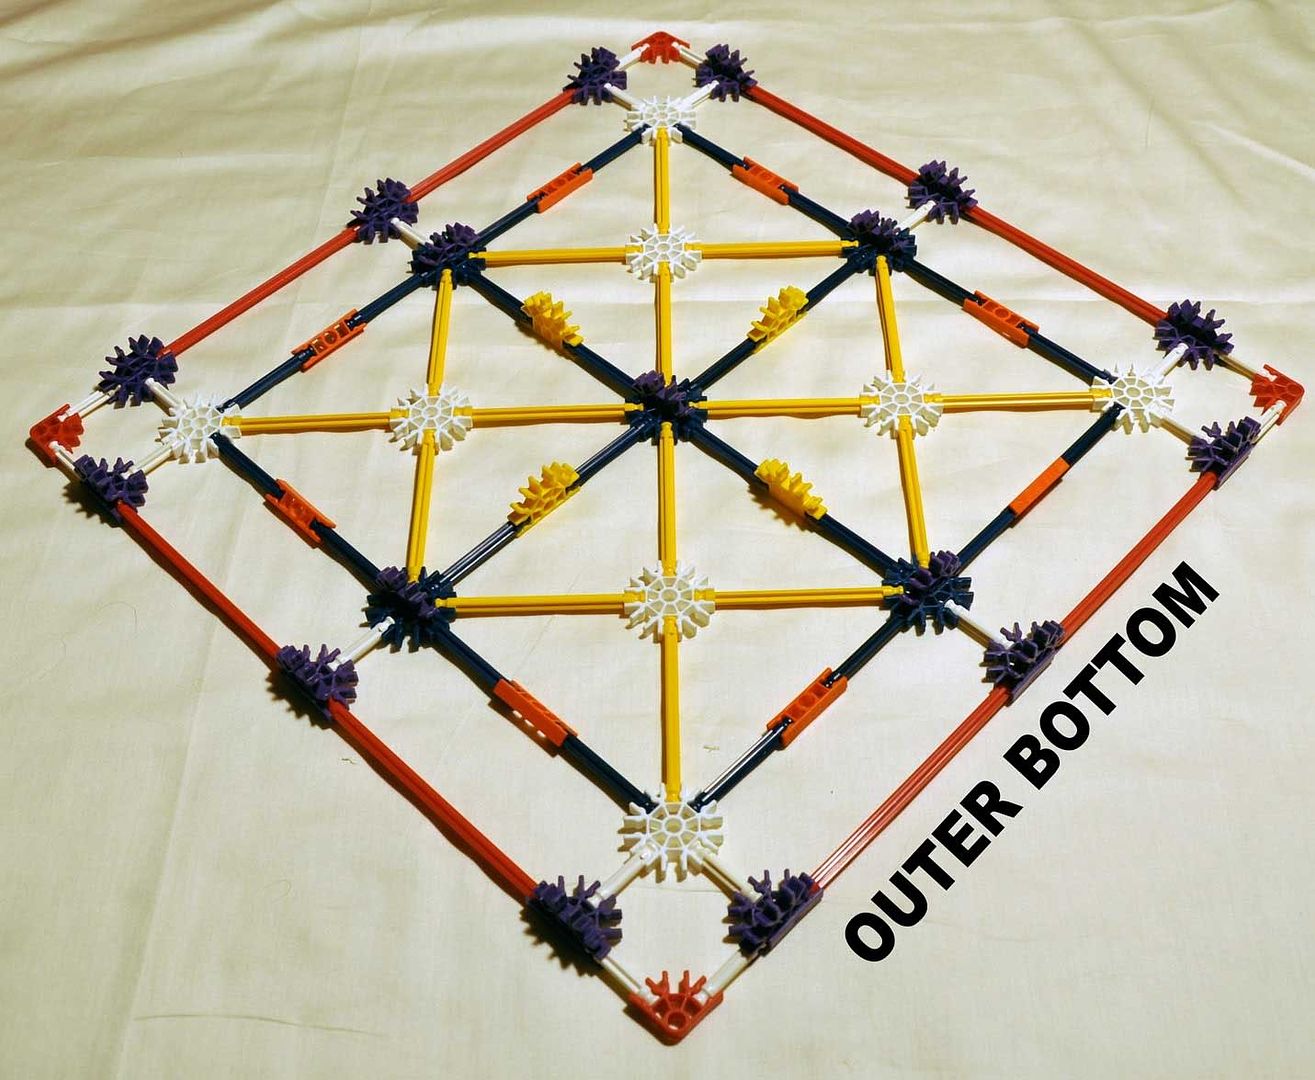
- Make the bottom most piece (Note: here I have used two blues and an orange connector to replace eight red pieces where I ran out)

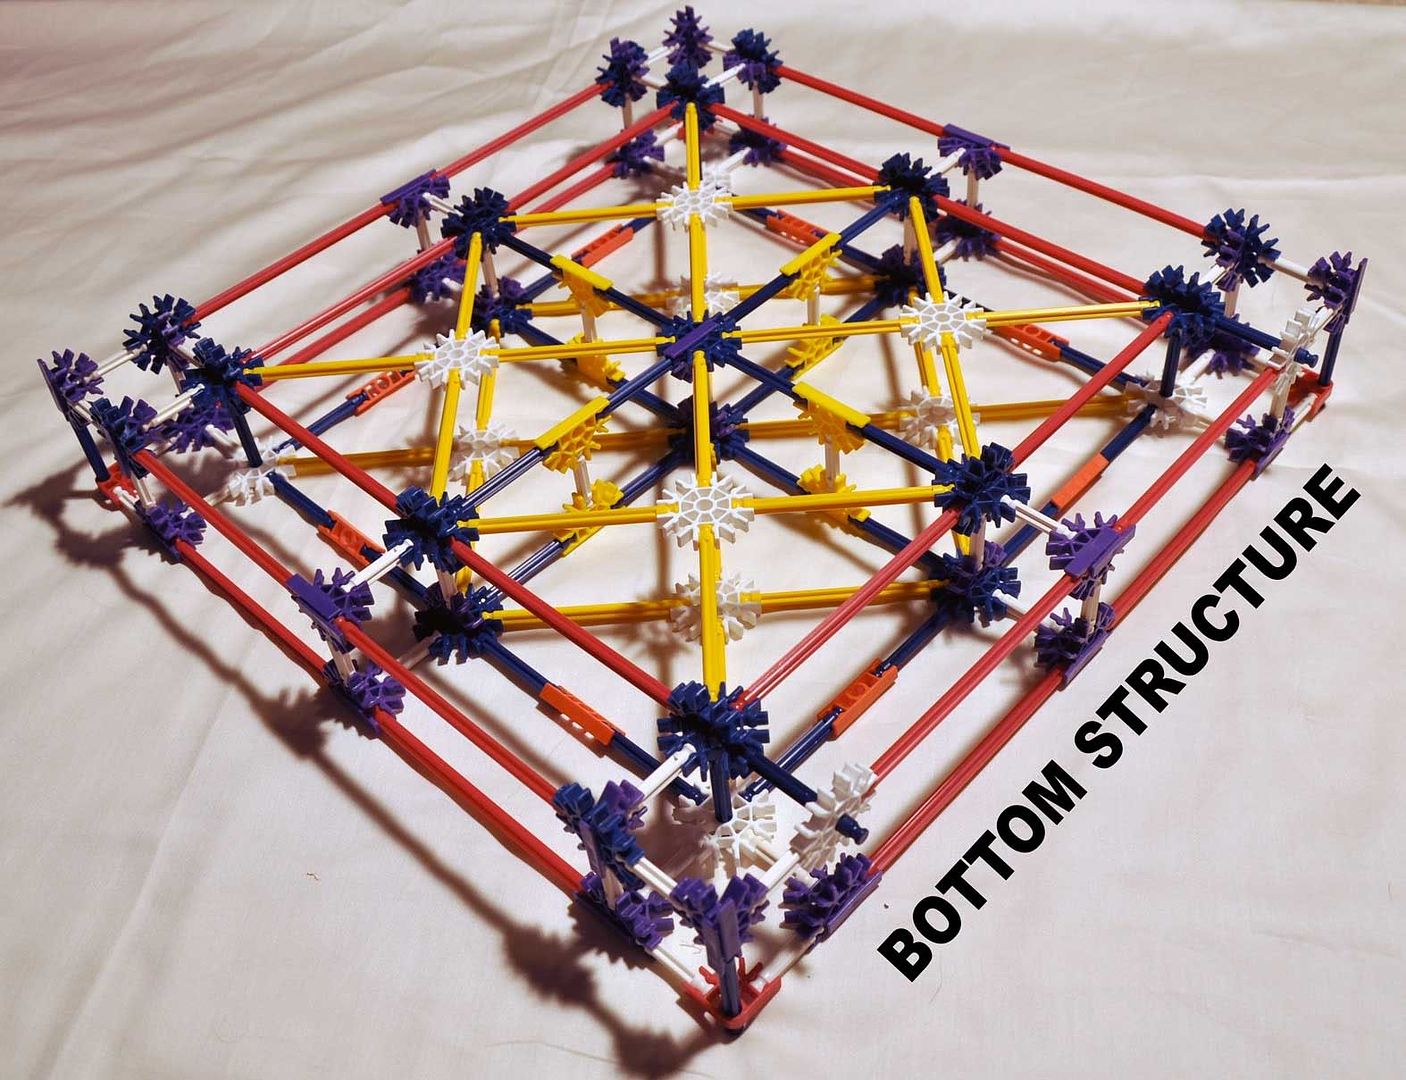
Outer Bottom - Construct bottom supports, noting places where blue rods have replaced white ones

Inner Bottom (upside down) - Join the two bottom pieces together so that blue rods slide into their red and white connector pieces, creating feet.

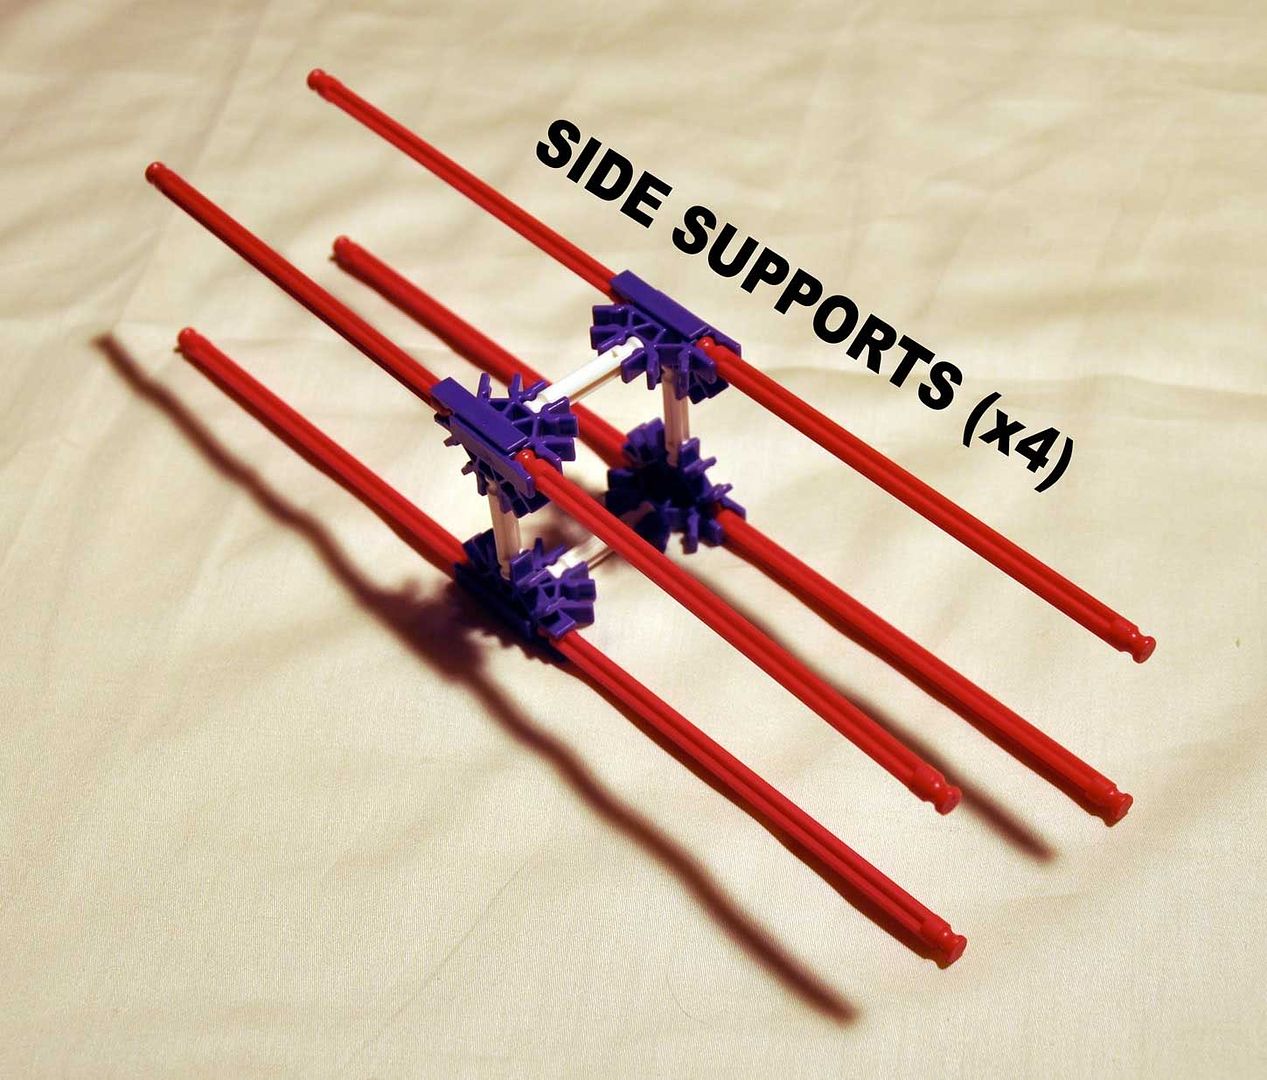
Bottom Structure - Make for side supports as follows:

Side Supports - Connect side suports to their appropriate positions on the bottom support

Bottom and Side Supports - Make topmost piece (easy!) noting the asterisks where blue rods replace white:

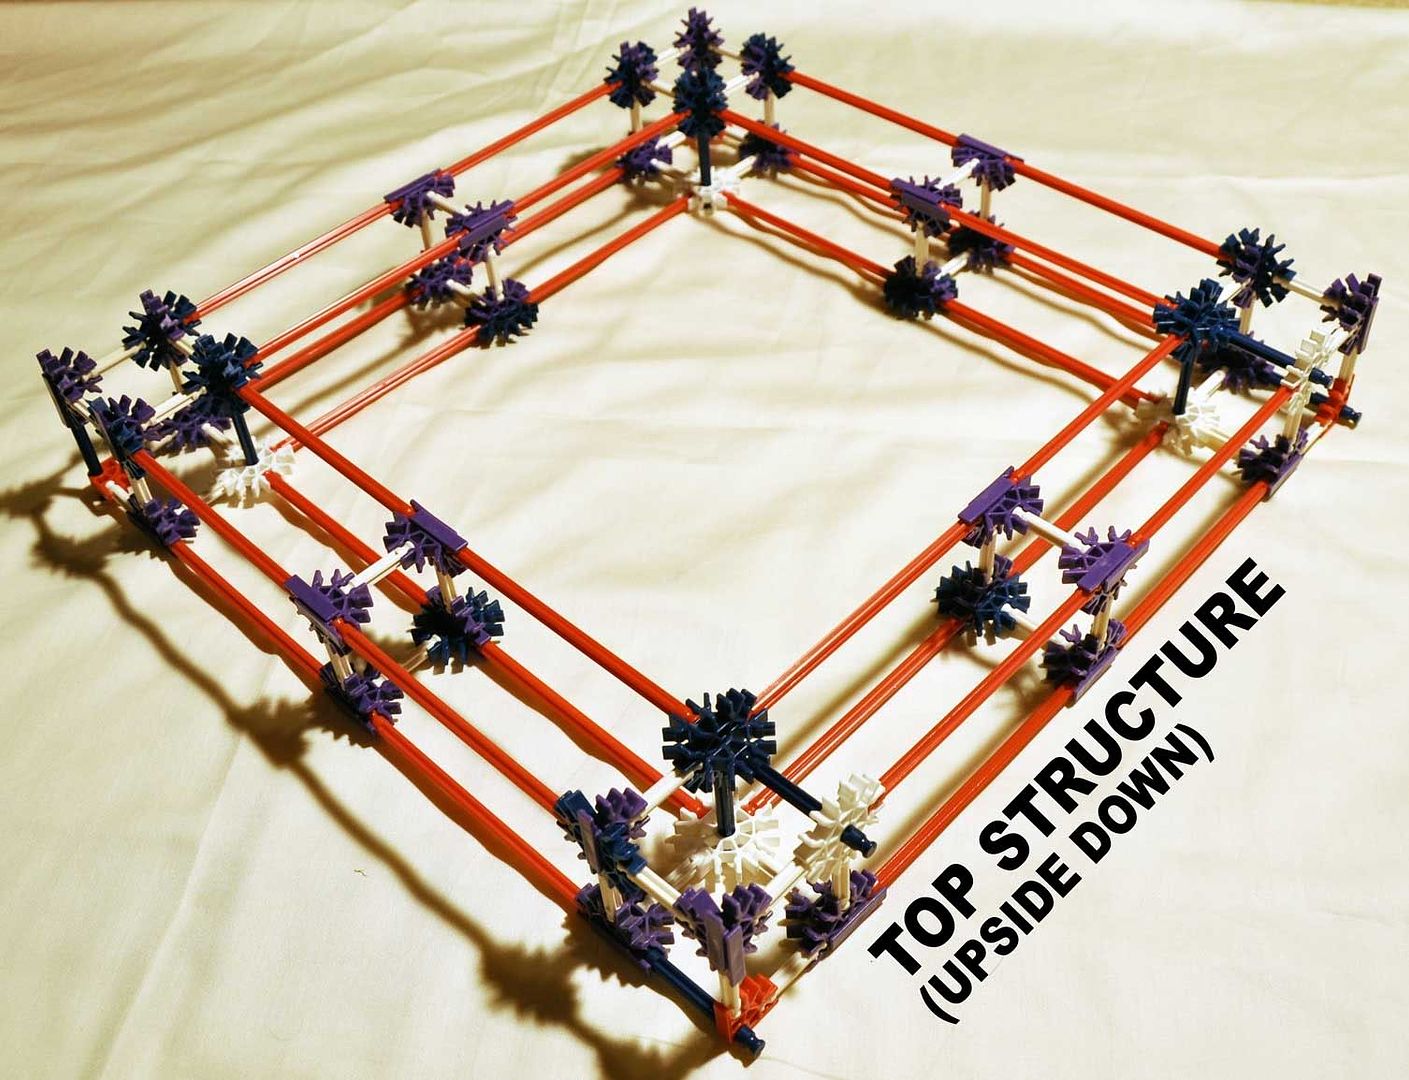
Outer Top (upside down) - Construct top supports, noting locations where blue supports replace white

Inner Top (upside down) - Connect two portions of the top structure together, so that blue rods slide into place, while white rods make solid connections to the remainder of the structure

Top Structure (upside down) - HURRAH!

Finished piece!


Lightbox Screen Sewing Instructions (It’s easy! You are making an opened box shape!):
- Iron fabric flat
- Cut the following: One “bottom” square measuring 17.5″x17.5″ and Four “side” squares measuing 17.5″x20″. [Remember: Jersey material is stretchy, which is great for pulling the screen across the sides of the lightbox, but treacherous in the cutting department. Be careful not to pull the fabric while cutting or your squares will come out wonky-shaped.]
- Pin and sew all four side pieces to four sides of bottom piece (Using a 1/2″ seam allowance)
- Iron all four bottom seams flat
- Pin and sew adjacent edges of side pieces together (Using a 1/2″ seam allowance), thus completing the box shape.
- Iron all four side seams flat
- Pin and finish the circumference of the opening with 3/4″ seam by folding the unfinished edge underneath itself
- Iron the finished opening flat and trim loose thread
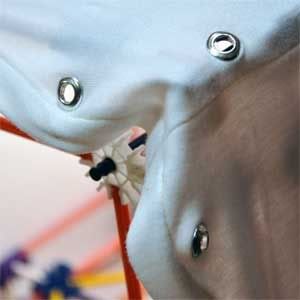
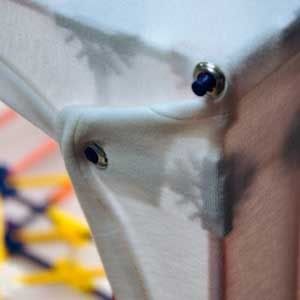
Eyelet Application
- Fit the finished lightbox screen over the K’nex structure with the opening at the top, and seams along all four corners
- For each side, pull the flap across the top so the screen fits snugly around the sculpture with two opposing sides overlapping their adjacent opposing sides
- On all four corners, use a pencil to mark the eyelet placement at all three points where the blue K’nex poke outwards from the frame
- Remove screen from K’nex structure
- Cut small holes at each point where you have made a pencil mark for an eyelet opening
- Hammer eyelets into each opening using a rubber hammer and an eyelet setter (Lisa at U*handbag has a great eyelet tutorial if you need a visual for this part)
Questions? e-mail me at spinhandspun@gmail.com Otherwise, happy photographing!
41 Comments so far
Leave a comment

[…] Boehm has posted a great detailed tutorial on how to make a lightbox out of K'Nex pieces for product photography. She was digging for the perfect materials and stumbled across a box […]
Pingback by K'Nex Lightbox Tutorial | Talk Update October 14, 2009 @ 8:02 PM[…] Boehm has posted a great detailed tutorial on how to make a lightbox out of K'Nex pieces for product photography. She was digging for the perfect materials and stumbled across a box […]
Pingback by Click World News » Blog Archive » K’Nex lightbox tutorial October 14, 2009 @ 9:01 PM[…] Boehm has posted a great detailed tutorial on how to make a lightbox out of K′Nex pieces for product photography. She was digging for the […]
Pingback by K'Nex lightbox tutorial » Developages - Development and Technology Blog October 14, 2009 @ 9:13 PM[…] Boehm has posted a great detailed tutorial on how to make a lightbox out of K’Nex pieces for product photography. She was digging for the perfect materials and stumbled across a box […]
Pingback by K’Nex lightbox tutorial « Knightsofcaldwell.com October 15, 2009 @ 1:01 AM[…] Boehm has posted a great detailed tutorial on how to make a lightbox out of K’Nex pieces for product photography. She was digging for the perfect materials and stumbled across a box […]
Pingback by K’Nex lightbox tutorial | Diy all the Way October 15, 2009 @ 5:12 AMWhile highly inventive, this project is almost ridiculously overcomplicated. Ideally, a lightbox of this type does two things, evens out the light, and removes distracting reflections from shiny or glossy objects. This box does a pretty good job at the first, but not such a good job at the second. All those colored rails and connectors would be a real problem if you were photographing something like silver or gold jewelry, as the color would reflect in the surface. I might suggest sewing a cube out of translucent fabric, and then attach the corners via fishing line to a frame built out of rails….
Comment by mfophoto October 15, 2009 @ 4:27 PM[…] Boehm has posted a great detailed tutorial on how to make a lightbox out of K’Nex pieces for product photography. She was digging for the perfect materials and stumbled across a box […]
Pingback by K’Nex lightbox tutorial | Something to share October 15, 2009 @ 8:39 AM[…] This post was Twitted by PosterJack_fr […]
Pingback by Twitted by PosterJack_fr October 15, 2009 @ 4:55 PM[…] a professional touch (maybe a simple cardboard one perhaps)? Share your expertise in the comments. K’Nex Lightbox Tutorial [Spin Hand Spun via […]
Pingback by Make a DIY Photography Light Box with K’Nex [Lightbox] | Geek News and Musings October 15, 2009 @ 5:00 PM[…] a professional touch (maybe a simple cardboard one perhaps)? Share your expertise in the comments. K’Nex Lightbox Tutorial [Spin Hand Spun via […]
Pingback by Make a DIY Photography Light Box with K’Nex [Lightbox] · TechBlogger October 15, 2009 @ 5:06 PM[…] a professional touch (maybe a simple cardboard one perhaps)? Share your expertise in the comments. K’Nex Lightbox Tutorial [Spin Hand Spun via […]
Pingback by Make a DIY Photography Light Box with K’Nex [Lightbox] | Diy all the Way October 15, 2009 @ 5:18 PM[…] a professional touch (maybe a simple cardboard one perhaps)? Share your expertise in the comments. K’Nex Lightbox Tutorial [Spin Hand Spun via […]
Pingback by innovation604 News Portal » Make a DIY Photography Light Box with K’Nex [Lightbox] October 15, 2009 @ 6:08 PM[…] a professional touch (maybe a simple cardboard one perhaps)? Share your expertise in the comments. K’Nex Lightbox Tutorial [Spin Hand Spun via […]
Pingback by Make a DIY Photography Light Box with K’Nex [Lightbox] | Superstars Of Gaming October 15, 2009 @ 6:20 PM[…] a professional touch (maybe a simple cardboard one perhaps)? Share your expertise in the comments. K’Nex Lightbox Tutorial [Spin Hand Spun via […]
Pingback by Make a DIY Photography Light Box with K’Nex [Lightbox] | Raise Your Marketing IQ October 15, 2009 @ 6:29 PM[…] K’Nex Lightbox Tutorial « spinhandspun designs spinhandspun.wordpress.com/2009/10/14/knex-lightbox-tutorial – view page – cached After months of photographing my work with so-so results, I decided it was time to invest in a lightbox. And what better way to do it than to Do It Yourself? In search of the perfect supplies, I… (Read more)After months of photographing my work with so-so results, I decided it was time to invest in a lightbox. And what better way to do it than to Do It Yourself? In search of the perfect supplies, I raided my parents basement and came across my favorite childhood toy: a box of K’nex! (Read less) — From the page […]
Pingback by Twitter Trackbacks for K’Nex Lightbox Tutorial « spinhandspun designs [spinhandspun.wordpress.com] on Topsy.com October 15, 2009 @ 6:34 PM[…] a professional touch (maybe a simple cardboard one perhaps)? Share your expertise in the comments. K’Nex Lightbox Tutorial [Spin Hand Spun via […]
Pingback by The Far Edge » Blog Archive » Make a DIY Photography Light Box with K’Nex [Lightbox] October 15, 2009 @ 8:21 PMcool Tutorial! Quite a bit different from the lightbox that I made using fabric, cardboard, and paper…
I like it
Comment by Dream Lane October 15, 2009 @ 9:40 PM[…] This post was Twitted by donraffael […]
Pingback by Twitted by donraffael October 16, 2009 @ 6:01 AMA lot of trouble for what you could basically have done with a lamp shade.
Comment by Barbara October 16, 2009 @ 8:13 AM[…] a professional touch (maybe a simple cardboard one perhaps)? Share your expertise in the comments. K’Nex Lightbox Tutorial [Spin Hand Spun via […]
Pingback by Make a DIY Photography Light Box with K’Nex [Lightbox] | Techno Portal October 16, 2009 @ 8:43 AM[…] K’Nex Lightbox Tutorial [Spin Hand Spun via Craftzine] Tagged:diyphotography […]
Pingback by Use K’Nex To Make A DIY Photography Light Box | Lifehacker Australia October 16, 2009 @ 8:59 AM[…] a professed contact (maybe a ultimate unreal one perhaps)? Share your skillfulness in the comments. K’Nex Lightbox Tutorial [Spin Hand Spun via […]
Pingback by Make a DIY Photography Light Box with K’Nex [Lightbox] | Web Burning Blog October 16, 2009 @ 7:20 PMgreat work for that box…really awesome
Comment by Wayan Parmana October 17, 2009 @ 10:15 AM[…] play with Tinker Toys. Now kids play with K’Nex. Over at spinhandspun designs, there is a tutorial on how to use the K’Nex to build a lightbox. I may just have to give this little DIY project […]
Pingback by Need a Lightbox? « David’s View Photography October 19, 2009 @ 7:08 AMYou can use PVC as well and the PVC joins to structure it, anysize and it breaks down easily. Glue the peices together you want to stay together when breaking down.
2 boxes for the sides, then 4 peices to make a box ou of those 2 sides.
Comment by scott October 20, 2009 @ 11:17 AMThe point made about photographing silver/gold/metallic articles, is valid. However, all one must do is paint the entire structure in flat/matte white paint and this will reduce (but not eliminate) those pesky reflections. A high enough “key” light might wash out any structural shadowing of the K’Nex pieces.
Comment by Nawlins Jeaux October 21, 2009 @ 9:51 AMi like your tutorial, very good, thanks
Comment by jack October 21, 2009 @ 1:20 PM[…] K’Nex Lightbox Tutorial « spinhandspun designs – […]
Pingback by Green Tee Readings » Links for October 15th through October 22nd October 22, 2009 @ 9:59 AM[…] a professional touch (maybe a simple cardboard one perhaps)? Share your expertise in the comments. K’Nex Lightbox Tutorial [Spin Hand Spun […]
Pingback by Make a DIY Photography Light Box with K’Nex « Always feel sensations! December 18, 2009 @ 12:03 AMThis is awesome I want to make one for hack factory!
Comment by Paul February 14, 2010 @ 10:18 AM[…] 2010/04/06 at 4:35 am · Filed under Awesomeness, Handy and tagged: diy, how-to, k'nex, lightbox, photography, to do From SpinHandSpun Designs K’Nex Lightbox Tutorial « spinhandspun designs […]
Pingback by K’Nex Lightbox Tutorial « vanilla.ryce.baby April 5, 2010 @ 10:36 PM[…] K'nex lightbox: DIY with lightbox with K'nex. […]
Pingback by 101 Hacks for Both the Amateur and Expert Photographer - Photography Colleges June 27, 2010 @ 9:16 PMThat’s really neat. I like the way you set up the piece count and the instructions.
Comment by knexkorner July 9, 2010 @ 8:04 AMthanks! to quote another commenter, this project may have been “almost ridiculously overcomplicated”… but your k’nex site is fabulous — i feel like i have found a partner in constructive-creative-crime.
Comment by spinhandspun July 9, 2010 @ 2:28 PM[…] that there is another great tutorial on creating a lightbox from Spinhandspun Design they end up making a lightbox / whitebox from your childhood K’nex! Serious […]
Pingback by two DIY create your own white box tutorials July 9, 2010 @ 2:02 PM[…] K’nex Lightbox Tutorial […]
Pingback by 100 Photography Tutorials for Professionals And Beginners | Tutorials Photoshop Flash 3d September 13, 2010 @ 1:31 AM[…] […]
Pingback by చాయాగ్రహణం photography|cinema|video|music|internet|multimedia|fine arts| :: వసంతం :: >>బీటా March 12, 2011 @ 7:18 AM[…] K’nex Lightbox Tutorial […]
Pingback by 100 Photography Tutorials for Professionals And Beginners « ricoromeo March 28, 2011 @ 5:18 AM[…] much all go about using cardboard boxes (although, there are some rare exemplary ones such as the K’Nex light box), but, I wanted to make my own type (and document it, of […]
Pingback by Vylen(ous) Works » My DIY Photography Light Box September 11, 2011 @ 5:56 AM[…] açıdan bir hayli başarılıydı, kendisinden profesyonel fotoğraf çekimlerinde kullanmak için ışık odası yapan bile vardı… Yap bakalım bunu Lego'dan yapabiliyor […]
Pingback by K’Nex | 90'lar Müzesi September 21, 2011 @ 5:33 AM[…] açıdan bir hayli başarılıydı, kendisinden profesyonel fotoğraf çekimlerinde kullanmak için ışık odası yapan bile vardı… Yap bakalım bunu Lego'dan yapabiliyor […]
Pingback by K’Nex | 90'lar Müzesi September 21, 2011 @ 5:33 AM